Slides

Slides were distributed by the SciFi Channel to media outlets, with promotional images for illustrating articles and reviews. Images included basic character portraits as well as production stills and behind-the-scenes photos.
|
General Merchandise: Photographs
Slides |
|
|
Slides were distributed by the SciFi Channel to media outlets, with promotional images for illustrating articles and reviews. Images included basic character portraits as well as production stills and behind-the-scenes photos. |
|
| Slide | Description & Notes |
 |
D'Argo & Crichton The white t-shirt and D'Argo's pale skin tone place this image in Season 1. |
 |
D'Argo & Zhaan D'Argo's pale skin tone places this image in Season 1. |
 |
Crichton & Aeryn Crichton's uniform places this image in Season 1. |
 |
Aeryn Sun & John Crichton Episode 101, "Premiere". |
 |
Lt. Teeg & Capt. Crais Episode 101, "Premiere". |
 |
John Crichton Episode 101, "Premiere". |
 |
John Crichton Episode 101, "Premiere". |
 |
Crichton & Bekhesh Episode 104, "Throne for a Loss" |
 |
Rygel, Crichton, & Zhaan Episode 104, "Throne for a Loss" |
 |
Crichton & Zhaan Episode 104, "Throne for a Loss" |
 |
Aeryn & D'Argo Episode 104, "Throne for a Loss" |
 |
Aeryn & NamTar Episode 109, "DNA Mad Scientist" |
 |
Crichton & Zhaan Episode 112, "Rhapsody In Blue " |
 |
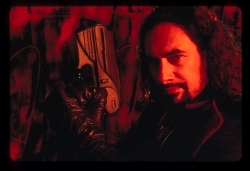
D'Argo & Crichton Crichton's outfit places this image mid-Season 1. |
 |
John Crichton Episode 116, "A Human Reaction" |
 |
John Crichton Crichton's outfit places this image in mid-Season 1. |
 |
Zhaan & Aeryn Estimated as mid-Season 1 image. |
 |
John Crichton Estimated as late Season 1 or Season 2 image. |
 |
Crichton, Zhaan, & Br'Nee Episode 121, "Bone to be Wild". |
 |
M'Lee Episode 121, "Bone to be Wild". |
 |
John Crichton Episode 121, "Bone to be Wild". |
 |
Scorpius & Crais Estimated as early Season 2 image. |
 |
Scorpius Estimated as early Season 2 image. |
 |
John Crichton Episode 203, "Vitas Mortis". |
 |
John Crichton Estimated as Season 2 image. |
 |
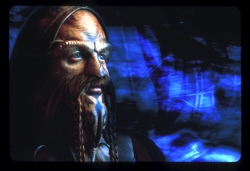
Ka D'Argo Episode 214, "Won't Get Fooled Again". |
 |
Crichton & Scorpius Episode 214, "Won't Get Fooled Again". |
 |
Zhaan as Oralla Episode 218, "A Not So Simple Plan (Liars, Guns and Money part 1)" |
 |
Natira Episode 218, "A Not So Simple Plan (Liars, Guns and Money part 1)". |
 |
Aeryn, Teurac, & Bekhesh Episode 219, "With Friends Like These (Liars, Guns and Money 2)". |
 |
Diagnosan Tocot Episode 222, "Die Me Dichotomy". |
 |
Tocot, Crichton, Grunchlk Episode 222, "Die Me Dichotomy". |
 |
Diagnosan Tocot Episode 222, "Die Me Dichotomy". |
 |
Crichton & Aeryn, et al Episode 222, "Die Me Dichotomy". |
 |
Aeryn Sun Episode 222, "Die Me Dichotomy". |
 |
D'Argo, Crichton, & Stark Episode 222, "Die Me Dichotomy". |
 |
Scorpius Episode 222, "Die Me Dichotomy". |
 |
Crichton & Scorpius Estimated as Season 3 image. |
 |
Zhaan & Moordil Episode 302, "Suns and Lovers". |
 |
John Crichton Episode 302, "Suns and Lovers". |
 |
Scorpius & Crichton Estimated as Season 3 image. |
 |
Season 1 Cast |
 |
Season 2 Cast |
 |
Season 3 Cast |
 |
Aeryn Sun |
 |
Aeryn Sun |
 |
Aeryn Sun |
 |
Chiana |
 |
Chiana |
 |
Chiana |
 |
Bialar Crais |
 |
Ka D'Argo |
 |
Ka D'Argo |
 |
Ka D'Argo |
 |
John Crichton |
 |
John Crichton |
 |
John Crichton |
 |
John Crichton |
 |
Moya |
 |
Pilot |
 |
Pilot |
 |
Rygel |
 |
Rygel |
 |
Rygel |
 |
Rygel |
 |
Rygel The man behind the puppet! |
 |
Chiana, Aeryn, & Sikozu Season 4 promotional image. |
 |
Zhaan |
 |
Zhaan |
 |
Behind the Scenes David Kemper and Brian Henson confer with Anthony Simcoe and Ben Browder. |
 |
Behind the Scenes Brian Henson confers with Claudia Black and Ben Browder. |
|
|
|
|
Comments, corrections, and contributions can be addressed to:
|

|
|
|
|